How to rotate an image with OpenCV
June 22, 2019
Somewhat surprisingly, rotating images in OpenCV is not a simple function call but requires a bit of math to do properly. The tutorial in the official documentation does not go into much detail on this, so this is my attempt of explaining how to do this after spending the effort of wrapping my head around the details myself.
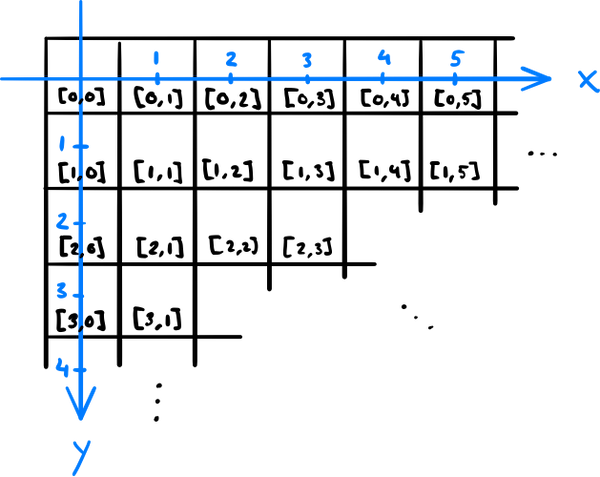
To make sense out of image rotations in OpenCV, we first need to understand the coordinate system used: An image is stored as an array, where the first index runs down and the second one to the right. This order of indexing is exactly how matrix elements are indexed in mathematics, except zero-based. In case of color images, there is also a third index, which indicates the image channel — e.g. the familiar red, green, and blue color channel if the image is represented in the RGB color space.
However, for geometric image transformations, the coordinate system
is a Cartesian one, so the horizontal coordinate comes first
and the vertical second. Furthermore, the y axis points down. This is
a common convention in computer graphics, but not in mathematics. So if
we want to know what the pixel value at the integer coordinates (x,y) in the image is, we
have to look at the values at [y, x] (in a grayscale image)
or [y, x, :] (color image) in the array.
The aim here is to rotate an image θ degrees in a way that none of it gets clipped out. The rotation alone is a linear transformation and straightforward to derive if you're fluent in trigonometry: The new coordinates of the original point (x,y) are, using the matrix notation, $$ \begin{pmatrix} x \\ y \end{pmatrix} \to \begin{pmatrix} x' \\ y' \end{pmatrix} = \begin{pmatrix} \cos\theta && \sin\theta \\ -\sin\theta && \cos\theta \end{pmatrix} \begin{pmatrix} x \\ y \end{pmatrix}. $$ Note that the minus sign is chosen here in the way that positive rotations are counterclockwise and takes into account that the y axis points down.
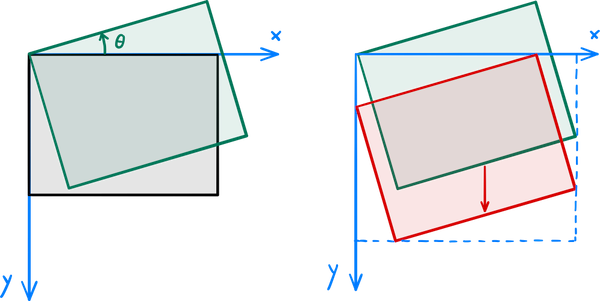
After applying the transformation to the image, OpenCV clips it to
the rectangle with the top-left corner at the origin and the
bottom-right corner at the destination image size. That's why we also
need to translate the image so that the topmost and leftmost points of
the rotated image land on the x and y axis, respectively, and calculate
the size that the rotated image takes (to use as the destination image
size). A rotation combined with translation is an affine
transformation. We can express the rotation by the angle θ followed by a translation of Δx horizontally and Δy vertically in the matrix
notation as $$
\begin{pmatrix} x \\ y \end{pmatrix}
\to
\begin{pmatrix} x' \\ y' \end{pmatrix} =
\begin{pmatrix} \cos\theta && \sin\theta && \Delta x \\
-\sin\theta && \cos\theta && \Delta y \end{pmatrix}
\begin{pmatrix} x \\ y \\ 1 \end{pmatrix}.
$$ The OpenCV function for applying an affine transformation to
an image is called warpAffine, and it takes the original
image, the above 2 × 3 matrix, and the
destination image size as its parameters.
OpenCV provides the function getRotationMatrix2D that
computes a rotation matrix about an arbitrary point. To get both the
needed translation and the destination image size, we can take the
corner points of the original image, rotate them by applying the above
rotation matrix, and compute the bounding box of those rotated points
using the OpenCV function boundingRect, which returns the
coordinates of the top-left corner and the width and the height of the
bounding box.
Putting this all together, we get the following example code:
import cv2
import numpy as np

image = cv2.imread("cat.jpg")
rotation_angle_degrees = 30  # counterclockwise

# Compute the rotation part of the affine transformation
transformation_matrix = cv2.getRotationMatrix2D((0, 0), rotation_angle_degrees, 1)

# Compute the translation and the new image size
nrows, ncols, _ = image.shape  # note the index order
original_corners = np.array([[0, 0], [ncols, 0], [ncols, nrows], [0, nrows]]).T
new_corners = np.int32(np.dot(transformation_matrix[:, :2], original_corners))
x, y, new_width, new_height = cv2.boundingRect(new_corners.T.reshape(1, 4, 2))
transformation_matrix[:, 2] = [-x, -y]

# Note the order of image width and height; they are in image coordinates
image = cv2.warpAffine(image, transformation_matrix, (new_width, new_height))

cv2.imwrite("rotated_cat.jpg", image)